Get crafty with these four crazy pumpkins for Halloween.
Funky Medina Pumpkin
Level: Intermediate
Designed by: Terri O
Inspired by: makeitfuncrafts.com
It was a combination of others that inspired me to create this cutie. I kind of put the two of them together along with some supplies I already had to make her. Yes, it is a her!
Supplies:
Medium size faux pumpkin
Lime green spray paint
STYROFOAM™ Brand Foam balls in 8”, 4”, 3”, or 2”
Design It:® Foam Cutter or Serrated Knife
Dimensional Fabric Paints; red, bright purple, orange, bright green and black
Crystal Clear Plastic Wrap
Toothpicks
Heat Gun or Hair Dryer with Hot Setting
Scissors
Low-temp Glue Gun
Feather boa
Red felt
Instructions for eyes courtesy makeitfuncrafts.com
1. To create the double eyes use the Foam Cutter or serrated knife to cut the eggs in half lengthwise. Lay them on the table side by side with cut sides down. Glue them together in unique ways to create fun looks with low-temp glue. Tilt the narrow ends of the eggs in and the wide ends apart to create “worried” eyes or cut the narrow end of the eggs off to create eyes peeking over something. Tip: Use the Foam Cutter to make a small flat spot where the two sides meet; this creates a larger surface for gluing the two pieces together, making a stronger bond. Toothpicks can also be inserted in between the pieces for added support.
2. Insert a toothpick into each ball of STYROFOAM* to use as a handle as you paint. Paint circles for the colored iris on each of the balls or eggs as large or as small as you desire. Let dry. Paint black circles in the center of the iris for pupils. Use black fabric paint to outline the pupils and the irises. Use red fabric paint to draw the red blood vessels. Let dry.
3. Cut squares of plastic wrap big enough to cover the eyeballs and a little extra to overlap slightly. Wrap each eyeball pulling it snug as you go to smooth creases. When wrapping the egg-shaped eyes, wrap each half egg separately. Use the heat gun or hair dryer (on hottest setting) to “shrink” the plastic wrap to the eyeballs giving them a glossy look.
Pumpkin
1. Paint pumpkin green.
2. Adorn the top with a boa.
3. Attach eyes.
4. Roll felt into two long rows. Shape like lips as you glue to pumpkin.
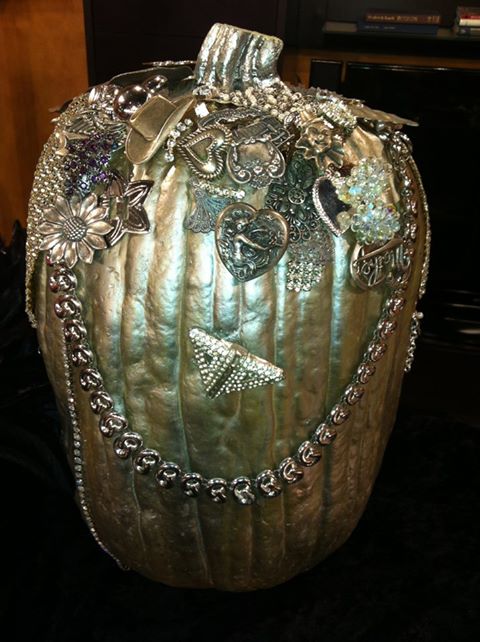 Metal Head Pumpkin
Level: Super Easy
Designed by: Terri O
This is so easy to make and your kids will think you are a rockin’ cool mom!
Supplies:
Black or metallic faux pumpkin or paint one black or metallic
Peel and stick studs and embellishments
Beads in a bottle by ILoveToCreate.com
Instructions:
1. Clean the surface of your pumpkin.
2. Attach the peel and stick studs and /or use the silver beads in a bottle. Let dry.
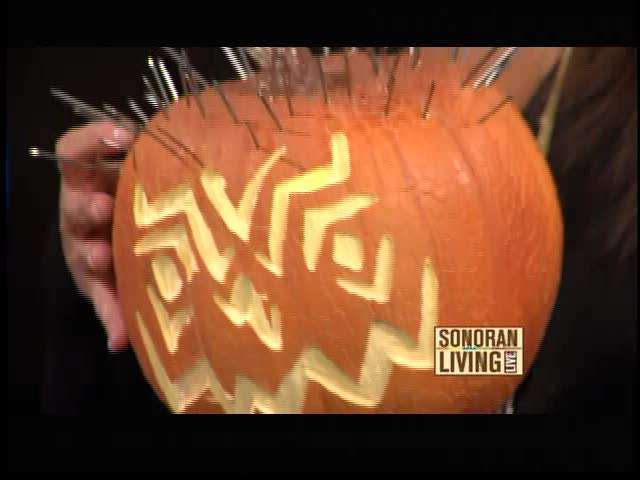 “Spike” the Pumpkin Head
Level: Advanced
Designed by: Terri O
Spike was a vision of mine for a long time. I just hated doing all the work on Spike knowing that it would only last a day or two. But with the invention of fake pumpkins, Spike became a reality.
Supplies:
Faux pumpkin
Dremel tool
Pattern
Finish nails size #6 & #8
Instructions:
1. Find a pattern for a pumpkin face you like. I found one on the internet for free.
2. Trace or draw your pattern on the pumpkin
3. Using a dremel tool with a 1/8th drill bit carve out your pattern. Be careful to not go thru the pumpkin.
4. Some fake pumpkins have holes already cut out at the bottom. If yours doesn’t, cut a hole big enough for your hand to fit thru.
5. Push the nails thru the top of the pumpkin to represent hair.
6. Use a flashlight inside the pumpkin to show off your design.
7. ***CAUTION*** These pumpkins are NOT designed to use a real candle or flame!!!!
 Claudia’s Think Pink Pumpkin
Level: Easy
Designed by: Terri O
Since October is Breast Cancer Awareness month I decided to dedicate a pumpkin to the cause. I lost someone very near and dear to me several years ago to the disease. Her name was Claudia Ouellette and she was my best friend and biggest fan. I miss her and when I see this pumpkin it makes me smile and think of her.
Supplies:
Medium faux pumpkin (I used the Funkin brand)
Pink spray paint
Black Feather wreath
1 4pc Black Damask Vinyl Wall Accents (made by DCWV-Home sku #GC-515-00064)
Blue Moon heart shaped metal connectors (sku #10212935 5 pc string)
Blue Moon Gloss Seed Bead strands I black (sku #66425 25111, 8 strands)
Blue Moon gloss black 40” metal chain (sku#66435 19338)
Glue gun or glue dots
Instructions:
1. Paint your pumpkin pink and let dry.
2. Place all 4 vinyl accents around pumpkin. If you are using a larger pumpkin you will need to packs.
3. Attach heart chain vertically between each accent.
4. Drape the chain from the top to each heart.
5. Lay the glass beads on the top. I did not attach mine because I can use them again for something else.
6. Set pumpkin inside the feather wreath.