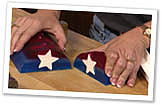
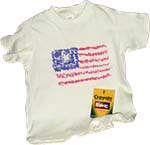
The day Americans celebrate freedom is midweek this year. For those of you celebrating your freedom at home, here’s a pre-party project for your bathroom plus one you can have super quick fun project an older teen can help the younger kids make.
Are there red white and blue towels in your bathroom this Fourth of July? How about white daisies and red carnations in a blue vase beside the sink? Well, you need soap for your Independence Day guests.
It’s pretty simple to make those pretty glycerin soaps with different colored shapes inside when you know how!
Materials Needed:
Glycerin soap
Large soap molds
Small soap molds
Small paintbrush
Soap fragranceSoap colorant
Spray bottle filled with alcohol
Step 1:
In a microwave-safe bowl, melt a small amount of glycerin soap in microwave for approximately 1 minute; add soap colorant.
Step 2:
Carefully pour soap into small mold, making certain to fill mold to the top. Spray with alcohol to get rid of any bubbles, then place in freezer for approximately 10 to 15 minutes.
Step 3:
Remove soap from molds and allow them to come to room temperature.
Step 4:
Using soap colorant, paint your small molds, then allow them to dry overnight.
Step 5:
Melt remaining glycerin soap in a medium-sized bowl for approximately 1 minute, or as needed, being careful not to burn the soap.
Step 6:
Add fragrance to melted soap. Note: A little goes a long way.
Step 7:
Carefully pour a small amount of soap into large mold; spray with alcohol to get rid of any bubbles, then place in freezer for approximately 2 minutes.
Step 8:
Place small soap pieces into the center of the large soap mold; spray with alcohol.
Step 9:
Heat remaining unused glycerin soap until just liquid. Make certain the soap won’t melt the small insert, then pour soap to the top of the large mold, spray with alcohol, then freeze 10 to 15 minutes.
Step 10:
Remove soap from molds, smooth sides of soap bars by rubbing sides, then trim as needed.
The kids will need supervision on this next one, but it goes pretty fast depending on how many little ones are celebrating.
Materials Needed:
Crayola fabric crayons
Few sheets of white typing or copier paper
T-shirt, cloth bag or fabric item of your choice
Iron
Ironing cloth (optional)
Step 1:
Draw a picture or design on piece of paper. Remember, when you iron it on, it will be reversed. So, the design should look as it would in a mirror. (For example, the “S” in the Superman symbol would look backwards to you unless you held it up in a mirror.)
Step 2:
After finishing your drawing, brush off any excess crayon. Then, place the picture face down in the spot where you want to transfer the image.
Step 3:
Use an ironing cloth or an extra sheet of paper between the iron and picture so your iron isn’t damaged by the crayons.
Step 4:
Set iron on cotton setting and no steam. Put iron down over a portion of the fabric. Let sit for a couple seconds, lift and move to another spot. Do not rub back and forth with iron; it will smear image.
Step 5:
You can lift up the corners of your paper to see if your image has transferred, being careful not to shift paper. The design will also begin to show through the paper once it’s ironed.
Helpful Hints:
The colors become more vibrant once they are ironed onto fabric.
Have fun!
Remember to thank a veteran or someone in ser


